This public version is no longer maintained and is now archived. For the latest maintained version, it's available as a SaaS offering at EZSCALE. If you like to ask questions about it please join the discord.
This does not work with any version of the BFACP do not try to run this application on that version. Use the latest stable PHP 5.6.
This is still a work in progress and bound to be bugs. If you still wish to run this version, scroll down to the bottom and follow the instructions. You must have access to the command line and have git/composer installed on your system.
If you would like to have this managed for you then EZSCALE is another alternative. Only $5 a month.
The Battlefield Admin Control Panel (BFACP) is a web based admin tool designed to work exclusively with AdKats (v6+) and XpKillers Chat, GUID, Stats and Mapstats Logger (v1.0.0.3). The software is built with the Laravel PHP framework to speed up development time and make my job a lot easier.
Due to the fact that some of the features in the original BFACP are not working as intended, I have decided to fork the project and make the necessary changes to make them work. After observing what admins on our servers would like to see in the BFACP, I also added new features that are not present in the original BFACP.
Since some of the new features rely on external services, be sure to message me for assistance. I will be happy to share the code with you and help you set these features up.
- Requirement: E4GL AdKats
This feature allows for seeing online watchlist players on the dashboard.
It is now possible to issue a punish command to a player directly from their profile.
Ban list search input field has been fixed and now works as intended.
- Requirement: Custom solution (message me for details)
This feature allows for viewing battlereports from your servers. 15 latest battlereports are shown on the dashboard, but there is also a dedicated page for viewing all battlereports.
SQL Table
CREATE TABLE bfacp_battlereports (
id                int auto_increment primary key,
guid              text not null,
battlereport_url  text not null,
map               varchar(100) not null,
duration          int not null,
total_players     int not null,
round_end_players int not null,
score_team_1      int not null,
score_team_2      int not null,
datetime          datetime default CURRENT_TIMESTAMP not null
);It is now possible to issue permanent bans directly from the scoreboard.
The player search input field does not work in the original BFACP on smaller screens. This has been fixed in this fork.
- Requirement: Event Logger plugin with logging of player disconnect events enabled to the database
This feature allows for viewing player disconnects history. It shows the time of the disconnect, the player's name, and the reason for the disconnect.
- Requirement: Custom solution (message me for details)
This feature allows for viewing player emblems. There is a dedicated page for viewing all player emblems including searching option. Current emblem can also be viewed in the player profile.
SQL Table
CREATE TABLE bfacp_emblems (
    id          int auto_increment primary key,
    playername  text not null,
    player_id   int not null,
    emblem_id   bigint not null,
    emblem_path text not null,
    created_at  timestamp default CURRENT_TIMESTAMP not null on update CURRENT_TIMESTAMP
);- Requirement: Custom solution (message me for details)
This feature allows for adding notes to players. Notes are visible in the player profile.
SQL Table
CREATE TABLE bfacp_player_notes (
     id        int auto_increment primary key,
     player_id int unsigned not null,
     admin_id  int unsigned not null,
     note      text not null,
     added_at  timestamp default CURRENT_TIMESTAMP not null on update CURRENT_TIMESTAMP,
     constraint bfacp_player_notes_tbl_playerdata_PlayerID_fk foreign key (player_id) references tbl_playerdata (PlayerID),
     constraint bfacp_player_notes_tbl_playerdata_PlayerID_fk_2 foreign key (admin_id) references tbl_playerdata (PlayerID)
);The background now instead of white dull color has a new splash image of a huge fight between jets.
This fork also includes smaller fixes and improvements to the original BFACP that are just not worth mentioning here. See the commits for more details.
- MySQL Database (5.6) or MariaDB 5.5 Series or MariaDB 10.x Series
- AdKats v6 or higher
- XpKillers Chat, GUID, Stats and Mapstats Logger v1.0.0.3+
- PHP 5.6
- PHP Extensions Required Mcrypt, PDO
- User, Role, and Permission system.
- Live Scoreboard with chat.
- Ban Management for AdKats.
- Detailed player information with graph charts.
- Server statistics page for each server showing population history, uptime history with data from UptimeRobot, and Mapstats.
- Metabans support.
- Report notifications.
- Chatlog searching where you can search by multiple players and/or keywords and ability to only show from a certain date/time range.
- Message of the Day
- Quick DB Stats overview
- and more!
Download here.
Download the latest version. Once downloaded unzip it to a temporary folder on your computer. Next open the .env.example file located in the root folder in your favorite text editor. Scroll down to the database settings section and fill in your database connection information.
DB_HOST=localhost
DB_DATABASE=homestead
DB_USERNAME=homestead
DB_PASSWORD=secret
Next we need to create a encryption key. This is IMPORTANT! The default key provided is just a placeholder string and is insecure. I have provided a page where you can get a random 32 character string. I do NOT save these, and they are random on each refresh. You can access this page here. Now go back to the .env.example file and replace the SomeRandomString with the key that was generated. By default it will look like this.
APP_KEY=SomeRandomString
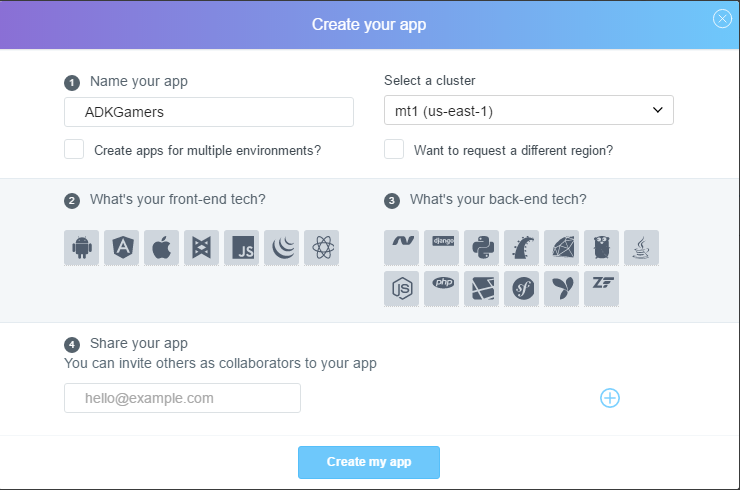
If you would like to have real-time online users & site chat, you will to create an account over at Pusher. Once you have your account and are logged in click on the "Your apps" tab on the left and click the button that says "Create new app". Now for the app name you can name it whatever you want, I just used my communities name. For the cluster selection choose the one that's the closest to your web server, if you know it, otherwise the default they provide is fine. After that click "Create my app" button.
You should now see your newly created app. Now click on the "App keys" tab. Copy the credentials to the appropriate field in the .env.example file.
PUSHER_APP_ID=null
PUSHER_KEY=null
PUSHER_SECRET=null
Once completed, save the file in the same location as .env.example and name it .env, then upload the entire application to your webserver. Once uploaded you will need to modify some file and folder permissions. Change the files and folders permissions under storage recursively to 0777. This includes the storage folder itself. Also do this for the builds folder located at public/js/builds
This application was designed to run on a subdomain and not from a folder from the TLD. Make sure to create a subdomain and if possible have domain point to the public folder that's located under the root folder. Not a redirect.
Now load up application in your web browser and it will begin the process of creating the tables. This process will take a few seconds to run on first load. When it completed you should see the dashboard.
Username: admin
Password: password
You can change the default username and password by clicking on Site Management > Users > Admin
If you have any questions or need help setting this up please post it here.
This method is only for those who have shell access to their web server or VPS. This will download and extract the files to your current directory. Make sure it's an empty directory.
If you have git installed you can just run the following command to install it. You must have composer and php command line installed.
git clone https://github.com/Prophet731/BFAdminCP.git .
composer install --no-scripts
This will clone and install the dependency's need for the BFACP to work. This will checkout the master branch which is the stable version. If you would like to run the develop version you will need to run git checkout develop before you issue the composer command.
To update it all you will need to do is run git pull and it will pull the latest version on the current branch (master or develop).
To make this an automated process you can create a cron job for it.
* * * * * cd /path/to/bfacp; git pull >/dev/null 2>&1
This product includes GeoLite2 data created by MaxMind, available from http://www.maxmind.com.
I will assume you already have a webspace setup for this. If not just follow directions above to get the basics setup then come back here. All you should need to do is follow the commands and you should be up and running.
Make sure the directory is empty.
cd /path/to/bfacp
git clone https://github.com/Prophet731/BFAdminCP.git .
git checkout dev-laravel5
composer install --no-scripts
chmod -R 0777 storage
chmod -R 0777 public/js/builds
cp .env.example .env
After you ran those command edit the file .env with the necessary information then save the file. Next enter these commands.
php artisan migrate --force
php artisan db:seed --force
If you were running a previous version then you will need to run this command as well.
php artisan bfacp:reseedYou should be good to go now. Make sure that you update the subdomain to point to the public folder for its directory (not a redirect). If you wish to update to the latest version of this branch just do a git pull.