How I used kernel resource controllers in Oracle Linux 6 to manage the allocation of system resources.
On large systems, kernel resource controllers—known as control groups (or cgroups)—can be especially useful to help strategic applications get the resources they need while limiting resources for other applications.
As a system administrator, whether you are consolidating applications on a large server or deploying systems to support service delivery in a cloud, it's often up to you to make sure that critical workloads get the system resources they need. Sometimes resources can be allocated temporarily, such as at the end of a fiscal period or so that a crucial project can be completed by a strict deadline. In other cases, application processes are greedy—notorious CPU or memory hogs—and it's necessary to limit resource consumption so other applications don't starve.
Having worked with resource controls in Oracle Solaris, I was anxious to learn how to do the same thing in Oracle Linux 6 with the Unbreakable Enterprise Kernel (UEK). Resource management using control groups (cgroups) is just one of many new features in Oracle Linux 6. Cgroups give administrators fine-grained control over resource allocations, helping to make sure that applications get what they need to deliver consistent response times and adequate performance.
According to the Linux kernel documentation, "Control Groups provide a mechanism for aggregating/partitioning sets of tasks, and all their future children, into hierarchical groups with specialized behaviour." This "behaviour" is defined by kernel subsystems—the actual resource controllers—that allocate system resources, track usage, and impose limits. Processes assigned to each group are then subject to the defined set of resource control parameters. An administrator assigns specific processes or system services to each group, adjusting resource parameters for the process group as needed.
In practice, an administrator can use cgroups to:
- Isolate a set of processes that tend to dominate resource consumption, restricting resource use to a preconfigured limit
- Assign sufficient memory or processing resources (either by specific nodes or relative shares) for an application or set of applications
- Allocate network or storage bandwidth (I/O throttling)
- Track assigned resources
- Restrict device access to specific users or groups (device whitelisting)
Note that some capabilities (specifically I/O throttling) require the Oracle Linux 6 UEK Release 2 kernel (2.6.39) or the Red Hat compatible kernel in Oracle Linux 6.1 or later. The UEK Release 2 kernel is available as a Beta release from ULN or from the public yum server.
The UEK Release 2 Beta kernel includes Linux Containers (lxc) that provide isolated environments with their own process and network space. I'll save the topic of using cgroups and Linux Containers for a possible future article, and focus on the basic cgroup functionality available now in Oracle Linux 6. For the examples in this article, I'll use the UEK Release 2 Beta release as a starting point. Be sure to read the Resource Management Guide and other references mentioned at the end of this article to learn more about cgroups.
Cgroups are especially valuable when consolidating multiple workloads on large servers since you can divide up resources among different workloads. For example, suppose I want to configure an AMP stack so that the MySQL server processes collectively get twice the CPU resources as the Apache Web server processes. To do this with cgroups, I allocate a 2-times relative share of processing power to a cgroup and assign all the mysqld processes to that group, while giving the group with the httpd processes only a single relative share (Figure 1).

Figure 1. Relative shares of CPU resources can be allocated to different process groups.
Alternatively, I can assign specific sets of CPU and memory resources to each cgroup, as conceptually shown in Figure 2. Since a cgroup can control multiple resources, I can allocate both CPU and memory to the same cgroup and associate the cgroup with a given set of processes.

Figure 2. Specific resources can be allocated to cgroups and assigned to process groups.
NUMA Pinning
For NUMA architectures, assigning specific resources has the effect of pinning processes to the same processor and memory nodes. This can be a big performance win since it allows a processor to access local rather than non-local memory.
Suppose I have a NUMA system with two nodes (to keep it simple), such as this:
# numactl --hardware
available: 2 nodes (0-1)
node 0 cpus: 0 4 8 12 16 20 24 28
node 0 size: 32349 MB
node 0 free: 22057 MB
node 1 cpus: 1 5 9 13 17 21 25 29
node 1 size: 32822 MB
node 1 free: 26766 MB
.
.
.
Figure 3 shows how multiple processor cores can be grouped into sets and allocated to specific processes of an AMP stack. Processor cores 0, 2, 4, 6, 8, 10, 12, and 14 are allocated into group1-web to support the set of Apache httpd daemons. Processor cores 1, 3, 5, 7, 9, 11, 13, and 15 are assigned to group2-db and the associated mysqld daemons. Local memory nodes are allocated to each cgroup.
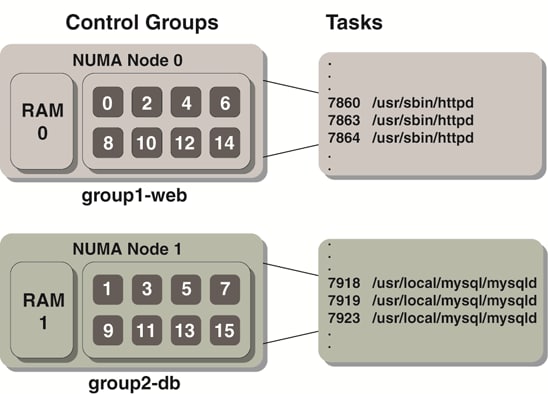
Figure 3. Cgroups can be configured to correspond to NUMA nodes.
Cgroups are implemented using a file system-based model—just as you can traverse the /proc tree to view process-related information, you can examine the hierarchy at /cgroup to examine current control group hierarchies, parameter assignments, and associated tasks.
In this tree-like file system hierarchy, children inherit characteristics from their parents. The file system implementation also enables access control—each cgroup pseudo-directory has an owner and a group that restricts who can modify the hierarchy and its underlying files, as well as what processes can be assigned to a cgroup.
Before I give examples of how to set up cgroups, let's clarify some terms:
- A cgroup associates a set of processes or tasks with a set of parameters for one or more subsystems.
- A subsystem is a resource controller that applies limits or acts upon a group of processes. Each subsystem has specific parameters that enable resource control and reporting mechanisms.
- A hierarchy is a set of subsystems and cgroups arranged in a tree, so that every system process is in exactly one of the cgroups in the hierarchy.
You can use the lssubsys command (which is included in the libcgroup package) to view the available kernel subsystems:
# lssubsys -am
cpuset
cpu
cpuacct
memory
devices
freezer
net_cls
blkio
Compared to the initial Oracle Linux 6 release (2.6.32), UEK Release 2 adds the blkio subsystem to enable I/O throttling. Here's a brief explanation of the various subsystems (see the Resource Management Guide for details on each subsystem and its parameters):
cpusetassigns individual CPUs and memory nodes to cgroup taskscpuschedules CPU access (for example, according to relative shares, as in Figure 1, or for real-time processes)cpuacctreports total CPU time used.memoryreports or limits memory use.devicesgrants or denies access to devices.freezersuspends or resumes tasks.net_clstags outgoing network packets with an identifier.blkioreports or controls I/O bandwidth for block devices.
For the examples in this article, I'll show how to set up non-persistent allocations using shell commands and later on show how to capture these settings into a persistent format. A note of caution (and common sense!)—when making modifications with a technology, such as cgroups, that impacts the kernel, it's recommended that you make on-the-fly changes only on non-production systems before applying changes to production workloads.
I'll walk through three examples:
- Using the
cpusetsubsystem to implement NUMA pinning - Device whitelisting
- I/O throttling
To illustrate how to allocate CPU and memory resources to a set of processes, I'll continue the example of a hypothetical AMP stack. Suppose I have a single physical server with two 8-core processors and I want to allocate 8 cores to the Apache Web server and 8 cores to the MySQL database, each with a dedicated local memory node (as shown in Figure 3). The steps below show how to make these allocations for the httpd and mysqld server processes.
Step 1: Confirm that libcgroup is installed.
Use the yum list command to verify that the libcgroup package is installed on Oracle Linux 6:
# yum list libcgroup
Loaded plugins: refresh-packagekit
Installed Packages
libcgroup.x86_64 0.37-2.el6 @anaconda-OracleLinuxServer-201105261616.x86_64/6.1
If the libcgroup package is not installed, use the command yum install libcgroup to install it.
Step 2: Create a cgroup hierarchy and attach subsystems.
There are two ways to create a hierarchy: First create a mount point for the hierarchy and then attach the appropriate subsystems with the mount command, or use the cgconfig service. In the first method, I create a hierarchy called cpu-n-ram and attach the cpu, cpuset, and memory subsystems using these commands:
# mkdir /cgroup/cpu-n-ram
# mount -t cgroup -o cpu,cpuset,memory - /cgroup/cpu-n-ram
The second way to create the cgroup hierarchy is for the cgconfig service to read the configuration file /etc/cgconfig.conf. The equivalent entry in this file for the mount would be as follows:
Copy
Copied to Clipboard
Error: Could not Copy
mount {
   cpuset  = /cgroup/cpu-n-ram;
   cpu     = /cgroup/cpu-n-ram;
   memory  = /cgroup/cpu-n-ram;
}
Restarting the cgconfig service reads the configuration file and creates the /cgroup/cpu-n-ram hierarchy:
# service cgconfig restart
In either case, I can confirm the mount's success using this command:
# mount | grep cgroup
cpu-n-ram on /cgroup/cpu-n-ram type cgroup (rw,cpu,cpuset,memory)
The mount has the effect of populating the hierarchy with parameter entries for the named subsystems, as shown in Listing 1.
Listing 1. Populating the Hierarchy with Parameter Entries
# ls /cgroup/cpu-n-ram
cgroup.procs                     memory.failcnt
cpu.rt_period_us                 memory.force_empty
cpu.rt_runtime_us                memory.limit_in_bytes
cpuset.cpu_exclusive             memory.max_usage_in_bytes
cpuset.cpus                      memory.memsw.failcnt
cpuset.mem_exclusive             memory.memsw.limit_in_bytes
cpuset.mem_hardwall              memory.memsw.max_usage_in_bytes
cpuset.memory_migrate            memory.memsw.usage_in_bytes
cpuset.memory_pressure           memory.soft_limit_in_bytes
cpuset.memory_pressure_enabled   memory.stat
cpuset.memory_spread_page        memory.swappiness
cpuset.memory_spread_slab        memory.usage_in_bytes
cpuset.mems                      memory.use_hierarchy
cpuset.sched_load_balance        notify_on_release
cpuset.sched_relax_domain_level  release_agent
cpu.shares                       tasks
The subsystem parameters are the heart of cgroup resource controls—they're essentially the knobs you turn to set limits, restrict access, or define allocations for each subsystem. Understanding the specific parameters will help you understand the possibilities for controlling resources with cgroups. The tasks file (last in the output in Listing 1) keeps track of processes associated with the hierarchy that are governed by the parameter settings. Once my setup is complete (after Step 5 below), the tasks file will contain all the process IDs (PIDs) assigned to the cgroup.
Step 3: Create a cgroup (cgcreate).
The following cgcreate commands create cgroups called group1-web and group2-db:
# cgcreate -g cpuset:/group1-web
# cgcreate -g cpuset:/group2-db
Note that you can use user and group ownership to control who has the authority to create cgroups within the hierarchy. The syntax is as follows, where -t <uid:gid> specifies the user and group IDs of those allowed to assign tasks to the cgroup and -a <uid:gid> refers to those who are allowed to administer the cgroup and change subsystem parameters:
cgcreate -t <uid:gid> -a <uid:gid> -g <subsystems:cgroup-path>
Discretionary Access Controls (DAC) mechanisms are applied to the directories and files that represent the cgroup and subsystem parameters, limiting cgroup changes to authorized users and groups.
Step 4: Set subsystem parameters for the cgroup (cgset).
The following cgset commands set parameters for the group1-web and group2-db cgroups, allocating CPU and memory nodes:
# cgset -r cpuset.cpus='0,2,4,6,8,10,12,14' group1-web
# cgset -r cpuset.cpus='1,3,5,7,9,11,13,15' group2-db
# cgset -r cpuset.mems='0' group1-web
# cgset -r cpuset.mems='1' group2-db
It's important to note that if you use the cpuset subsystem in a cgroup definition, the parameters cpuset.cpus and cpuset.mems are mandatory parameters and must be defined. All kernel subsystem parameters are documented in the Resource Management Guide.
Step 5: Assign processes to a cgroup.
There are several ways to assign a process or set of processes to a cgroup so that they will be governed by the associated resource controls. The cgclassify command moves an existing process into a cgroup:
# cgclassify -g cpuset:group1-web 1683
This has the same effect as putting PID 1683 into the tasks file:
# echo 1683 > /cgroup/cpu-n-ram/group1-web/tasks
Children of a process inherit their parent's cgroup, so a "founding father" process can be used so that subsequent child processes (ones that are forked, exec'd, or cloned) will have the same cgroup as the parent. A simple way to illustrate this concept is to attach the current shell to a cgroup, as follows:
# echo $$ > /cgroup/cgroup-name/tasks
Any process subsequently launched in the shell is automatically assigned to the shell's cgroup.
Alternatively, the cgexec command can launch a process in the specified cgroup:
# cgexec -g cpuset:group1-web httpd
For services that have a configuration file in /etc/sysconfig, you can edit the configuration file to allocate the service to a cgroup automatically. For example, add this line to /etc/sysconfig/httpd:
CGROUP_DAEMON="cpuset:group1-web"
Then start the service to automatically execute the processes in the specified cgroup:
# service httpd start
There's also a way to set up rules so that processes are automatically assigned to particular groups by cgred (the cgroup rules engine daemon). The cgred daemon moves tasks into cgroups according to settings in the /etc/cgrules.conf file. See the documentation for details.
Once I've assigned processes to a cgroup, the kernel executes those tasks within the resource allocations I've set. In the case of the AMP processes, I haven't given the httpd and mysqld processes exclusive access to their perspective CPU and memory resources. If other processes need those resources and the CPU/memory nodes are available, they can still run using those allocated resources. However, there are two other parameters—cpuset.cpu_exclusive and cpuset.mem_exclusive—that can change this default behavior and grant exclusive access.
Instead of the cpuset subsystem, I could have used other subsystems to moderate CPU and memory usage for the httpd and mysqld processes. For example, if I wanted the group of mysqld processes (group2-db) to have twice the total CPU time collectively as the cgroup of httpd processes (group1-web), I could set cpu.shares=1 for cgroup1-web and cpu.shares=2 for cgroup2-db, giving twice the relative CPU time for the database servers. I can also set memory limits for the cgroups using memory subsystem parameters. The parameter memory.limit_in_bytes restricts the maximum amount of user memory for processes in a cgroup, while memory.memsw.limit_in_bytes limits both user memory and swap space.
The devices subsystem provides fine-grained control for system devices. An administrator can define cgroups that restrict access to particular devices and define what users or groups can access those devices, augmenting security and data protection measures. I'll step through an example.
Step 1: Create a cgroup and attach the subsystem.
First I'll create a hierarchy and attach the devices subsystem:
# mkdir /cgroup/devtest
# mount -t cgroup -o devices - /cgroup/devtest
This populates the hierarchy with the pseudo-files that represent the subsystem parameters:
# ls -l /cgroup/devtest
total 0
-rw-r--r--. 1 root root 0 Jan 16 09:45 cgroup.clone_children
--w--w--w-. 1 root root 0 Jan 16 09:45 cgroup.event_control
-rw-r--r--. 1 root root 0 Jan 16 09:45 cgroup.procs
--w-------. 1 root root 0 Jan 16 09:45 devices.allow
--w-------. 1 root root 0 Jan 16 09:45 devices.deny
-r--r--r--. 1 root root 0 Jan 16 09:45 devices.list
-rw-r--r--. 1 root root 0 Jan 16 09:45 notify_on_release
-rw-r--r--. 1 root root 0 Jan 16 09:45 release_agent
-rw-r--r--. 1 root root 0 Jan 16 09:45 tasks
Step 2: Create a cgroup (cgcreate).
The following cgcreate command creates the group3-dev cgroup:
# cgcreate -g devices:/group3-dev
Step 3: Set subsystem parameters (cgset).
For this example, I'll control access to the first hard disk drive, /dev/sda. To identify the major and minor device numbers of /dev/sda, I examine the device node:
# ls -l /dev/sda
brw-rw---- 1 root disk 8, 0 Jan 16 09:24 /dev/sda
According to ls, /dev/sda has a major number of 8 and minor number of 0. The following cgset command sets the parameter to deny access to /dev/sda:
# cgset -r devices.deny='b 8:0 mrw' group3-dev
The b indicates a block device, but it's possible to restrict access to both block and character devices. (Block devices—such as hard disks, flash drives, and CDROMs—move data in buffered blocks, unlike character devices—such as keyboards, mice, and serial devices—which transmit data character by character.)
Step 4: Assign processes to the cgroup.
I'll attach the current shell to the cgroup so that the shell and any subsequent commands are automatically assigned to the tasks pseudo-file for cgroup group3-dev:
# echo $$ > /cgroup/devtest/group3-dev/tasks
Step 5: Test device access.
At this point, I can still access the inode and see that the device exists:
# file /dev/sda
/dev/sda: block special
However, even though I'm root, I can't read from the device or accidentally run fdisk:
# dd if=/dev/sda bs=512 count=1
dd: opening `/dev/sda': Operation not permitted
# fdisk /dev/sda
Unable to open /dev/sda
To allow access, I change the subsystem parameter devices.allow:
# cgset -r devices.allow='b 8:0 mrw' group3-dev
Now I can read from the device:
# dd if=/dev/sda of=/dev/null bs=512 count=1
1+0 records in
1+0 records out
512 bytes (512 B) copied, 0.000514591 seconds, 995 kB/s
The devices subsystem is designed to restrict or permit access to devices, providing a fine-grained way of protecting data.
Whereas the devices subsystem controls or denies device access, the blkio subsystem moderates I/O operations to the specified block devices, as this next example shows.
Processes assigned to the blkio subsystem can control I/O operations to block devices in two ways:
- Via a weighting factor. A
blkiosubsystem parameter (blkio.weight) allows each cgroup to have a relative portion of available I/O. The weighting mechanism is implemented in the Completely Fair Queuing I/O scheduler. (See the documentation for more information.) - Via I/O throttling. Subsystem parameters allow you to set an upper limit on the number of I/O operations for a block device. This provides a means of limiting read/write rates for processes assigned to the cgroup.
In this example, I'll configure a throttling function for certain processes, restricting the I/O bandwidth (in bytes/second) for the hard disk device /dev/sda. I'll then show how to set an upper limit for the number of I/O operations per second for cgroup processes that read from the device.
Limiting Bandwidth
Step 1: Create a cgroup and attach the subsystem.
First I'll make sure the blkio controller is mounted:
# grep blkio /proc/mounts || mkdir /cgroup/blkio ; mount -t cgroup -o blkio none /cgroup/blkio
Step 2: Create a cgroup (cgcreate).
I'll create a cgroup called io-test:
# cgcreate -g blkio:/io-test
Step 3: Assign processes to the cgroup.
I'll assign the current shell to this cgroup so that the blkio controller manages the I/O of every subsequent command executed inside the shell:
# echo $$ > /cgroup/blkio/io-test/tasks
Step 4: Set subsystem parameters.
I want to specify a bandwidth rate to throttle I/O to the drive /dev/sda for all processes in the cgroup. I'll first check the device's uncapped read performance using hdparm -t:
# hdparm --direct -t /dev/sda
/dev/sda:
 Timing O_DIRECT disk reads: 350 MB in  3.00 seconds = 116.61 MB/sec
To establish an upper limit for bandwidth, I need to set the subsystem parameter blkio.throttle.read_bps_device. Its format is <major>:<minor> <bytes_per_second>. Again, I'll look at the device node to obtain the major and minor numbers:
# ls -l /dev/sda
brw-rw---- 1 root disk 8, 0 Jan 16 10:01 /dev/sda
Now I'll put a limit of 1 MB/sec (1024x1024 bytes) on reads originating from this device:
# echo "8:0 1048576" > /cgroup/blkio/io-test/blkio.throttle.read_bps_device
Alternatively, I could have used the cgset command:
# cgset -r blkio.throttle.read_bps_device="8:0 1048576" io-test
I'll check the read performance again:
# hdparm --direct -t /dev/sda
/dev/sda:
 Timing O_DIRECT disk reads:   4 MB in  4.00 seconds =   1.00 MB/sec
The overall throughput is now limited to the specified rate.
I can remove the bandwidth limitation by setting blkio.throttle.read_bps_device to zero:
# echo "8:0 0" > blkio.throttle.read_bps_device
Or, alternatively:
# cgset -r blkio.throttle.read_bps_device="8:0 0" io-test
If I recheck the throughput, the rate has returned to its previously uncapped state:
# hdparm --direct -t /dev/sda
/dev/sda:
 Timing O_DIRECT disk reads: 352 MB in  3.00 seconds = 117.17 MB/sec
Limits for writes can be configured in a similar fashion, by writing the bytes per second value into the blkio.throttle.write_bps_device file.
Limiting IOPS
As an alternative to limiting the overall bandwidth, I can also limit the maximum number of I/O operations per second (IOPS) for the device. I'll use iostat to measure the uncapped IOPS of the device (iostat is part of the sysstat package), and I'll use hdparm to generate some disk load.
In a separate shell (for example, another terminal window), I run the iostat command:
# iostat 1 -d /dev/sda
The output updates every second, summarizing the number of IOPS for the drive. In my "founding father" window, I run an hdparm command (specifically, hdparm --direct -t /dev/sda) and observe how the transactions-per-second value (tps) changes for iostat:
Device:            tps    kB_read/s    kB_wrtn/s    kB_read    kB_wrtn
sda              31.00     15872.00         0.00      15872          0

Device:            tps    kB_read/s    kB_wrtn/s    kB_read    kB_wrtn
sda             235.00    120320.00         0.00     120320          0

Device:            tps    kB_read/s    kB_wrtn/s    kB_read    kB_wrtn
sda             240.00    122880.00         0.00     122880          0
Note how tps jumps from 31 in idle mode to above 230 while hdparm is running. To restrict the IOPS rate to 50 for the device /dev/sda, I'll go back to my "founding father" window and set the blkio subsystem parameter to throttle IOPS for reads:
# echo "8:0 50" > /cgroup/blkio/io-test/blkio.throttle.read_iops_device
I run the hdparm test again and observe the capped transactions-per-second values in the iostat output:
Device:            tps    kB_read/s    kB_wrtn/s    kB_read    kB_wrtn
sda               0.00         0.00         0.00          0          0

Device:            tps    kB_read/s    kB_wrtn/s    kB_read    kB_wrtn
sda              10.00      5120.00         0.00       5120          0

Device:            tps    kB_read/s    kB_wrtn/s    kB_read    kB_wrtn
sda              50.00     25600.00         0.00      25600          0

Device:            tps    kB_read/s    kB_wrtn/s    kB_read    kB_wrtn
sda              50.00     25600.00         0.00      25600          0
It's easy to see how the blkio resource controller did its job, limiting the maximum IOPS rate to 50. As a consequence, the throughput measured by hdparm will also drop.
To disable I/O throttling based on IOPS, set the value of the subsystem parameter to zero again:
# echo "8:0 0" > /cgroup/blkio/io-test/blkio.throttle.read_iops_device
Using the blkio controller gives you a flexible tool to limit the disk I/O utilization of a process group, allowing you to establish service level agreements with clearly defined upper limits for bandwidth and throughput.
Up to this point, everything I've done on the command line won't persist across reboots. Once I've set up hierarchies, attached cgroups, and defined parameters the way I want them, I can capture an existing configuration with cgsnapshot:
# cgsnapshot -s > cgconfig-example.conf
Listing 2 shows the captured configuration.
Listing 2. Output from cgsnapshot
Copy
Copied to Clipboard
Error: Could not Copy
# Configuration file generated by cgsnapshot
mount {
  cpuset = /cgroup/cpu-n-ram;
  cpu = /cgroup/cpu-n-ram;
  memory = /cgroup/cpu-n-ram;
devices = /cgroup/devtest;
blkio = /cgroup/blkio;
}

group group2-db {
  cpuset {
    cpuset.memory_spread_slab="0";
    cpuset.memory_spread_page="0";
    cpuset.memory_migrate="0";
    cpuset.sched_relax_domain_level="-1";
    cpuset.sched_load_balance="1";
    cpuset.mem_hardwall="0";
    cpuset.mem_exclusive="0";
    cpuset.cpu_exclusive="0";
    cpuset.mems="1";
    cpuset.cpus="1,3,5,7,9,11,13,15";
  }
  cpu {
    cpu.rt_period_us="1000000";
    cpu.rt_runtime_us="0";
  }
  memory {
    memory.memsw.failcnt="0";
    memory.memsw.limit_in_bytes="9223372036854775807";
    memory.memsw.max_usage_in_bytes="0";
    memory.swappiness="60";
    memory.use_hierarchy="0";
    memory.failcnt="0";
    memory.soft_limit_in_bytes="9223372036854775807";
    memory.limit_in_bytes="9223372036854775807";
    memory.max_usage_in_bytes="0";
  }
}

group group1-web {
  cpuset {
    cpuset.memory_spread_slab="0";
    cpuset.memory_spread_page="0";
    cpuset.memory_migrate="0";
    cpuset.sched_relax_domain_level="-1";
    cpuset.sched_load_balance="1";
    cpuset.mem_hardwall="0";
    cpuset.mem_exclusive="0";
    cpuset.cpu_exclusive="0";
    cpuset.mems="0";
    cpuset.cpus="0,2,4,6,8,10,12,14";
  }
  cpu {
    cpu.rt_period_us="1000000";
    cpu.rt_runtime_us="0";
  }
  memory {
    memory.memsw.failcnt="0";
    memory.memsw.limit_in_bytes="9223372036854775807";
    memory.memsw.max_usage_in_bytes="7303168";
    memory.swappiness="60";
    memory.use_hierarchy="0";
    memory.failcnt="0";
    memory.soft_limit_in_bytes="9223372036854775807";
    memory.limit_in_bytes="9223372036854775807";
    memory.max_usage_in_bytes="7303168";
  }
}

group group3-dev {
  devices {
    devices.deny="a *:* rwm";
    devices.allow="b 8:0 rwm";
  }
}

group io-test {
  blkio {
    blkio.throttle.write_iops_device="";
    blkio.throttle.read_iops_device="";
    blkio.throttle.write_bps_device="";
    blkio.throttle.read_bps_device="";
    blkio.reset_stats="";
    blkio.weight="500";
    blkio.weight_device="";
  }
}
Cgroups are implemented as a service that reads the configuration file /etc/cgconfig.conf to populate the cgroup hierarchy at boot time. To make cgroup definitions and allocations persistent across reboots, you can edit the default configuration file—inserting the captured subsystem mounts, cgroup definitions, and parameter specifications, as shown in Listing 2—and then restart the cgconfig service:
# service cgconfig restart
Once the cgconfig service is restarted, you can assign processes to the defined cgroups or use the cgred daemon to assign processes based on the rules you've created.
This article just begins to scratch the surface of what is possible with cgroups. It's easy to see how this feature will integrate with Linux Containers—administrators will be able to create operating user space environments with precise control over CPU, memory, and I/O resources, which will be ideal for consolidation efforts. I'm looking forward to future developments around cgroups and Oracle Linux 6 UEK Release 2.
Here are the resources referenced earlier in this document:
- ULN: http://linux.oracle.com/
- Public yum server: http://public-yum.oracle.com/beta/
- Resource Management Guide: http://linux.oracle.com/documentation/EL6/Red_Hat_Enterprise_Linux-6-Resource_Management_Guide-en-US.pdf
And here are some additional resources:
- Wikipedia entry on cgroups: http://en.wikipedia.org/wiki/Cgroups
libcgroupman pages- Oracle Linux 6 documentation: http://linux.oracle.com/documentation/
- @ORCL_Linux on Twitter: http://twitter.com/ORCL_Linux
- Oracle Linux on Facebook: http://www.facebook.com/OracleLinux
原文链接:https://www.oracle.com/technical-resources/articles/linux/resource-controllers-linux.html